Piriformis syndrome is a condition characterized by pain, numbness, and tingling in the buttocks and down the leg. It occurs when the piriformis muscle, located in the buttock region, becomes tight or inflamed, compressing the sciatic nerve. Finding effective solutions for pain relief and management is crucial for individuals suffering from this syndrome.
A stretches for piriformis syndrome.pdf can be downloaded at the end of the article
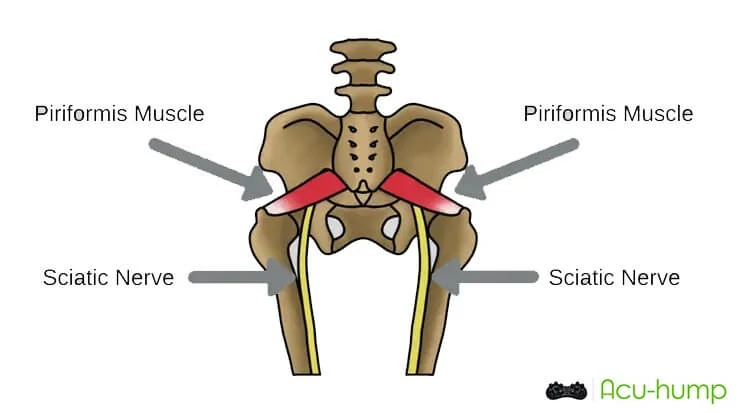
What is piriformis muscle and piriformis syndrome?
The piriformis muscle is a small muscle located deep within the buttock region. It plays a vital role in hip rotation and stabilization. When the piriformis muscle becomes tight or inflamed, it can compress the sciatic nerve, leading to this discomfort. The causes of this syndrome can vary, including overuse, trauma, or muscle imbalances. Commom piriformis pain symptoms include pain, numbness, and tingling in the buttocks and down the leg.
Acu-hump® Relieve Piriformis Pain
When this muscle becomes tight or inflamed, it can compress or irritate the sciatic nerve that runs beneath it, resulting in a condition known as piriformis syndrome. There are several reasons why piriformis syndrome may occur, such as overuse of the muscle, traumatic injury, or even sitting for prolonged periods. Regardless of the cause, the resulting discomfort and pain can be managed through targeted stretches and exercises that target the piriformis muscle.
Modified Stretching Exercises for Piriformis Syndrome
1# Step: Warm Up – 30s
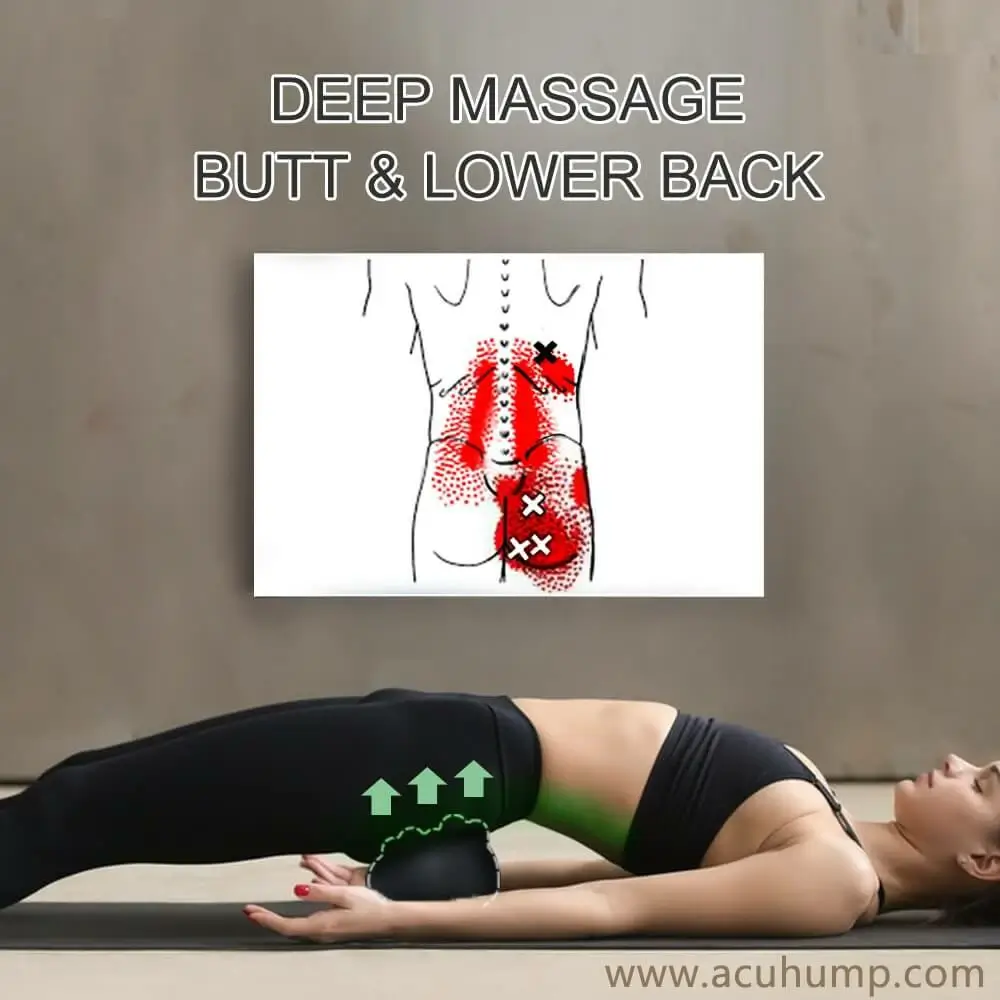
The Acu-hump is designed to specifically target the lower back and buttock muscles, providing a deep tissue massage and promoting muscle relaxation. By applying pressure to these tight and knotted muscles, the Acu-hump helps to release tension and improve blood circulation, ultimately aiding in pain relief and muscle recovery.
Acu-hump: 30-day return policy. No risk for you.
To use the Acu-hump, simply place it under your lower back with the taller side near your head and aligned with the QL muscles. Lie on top of the Acu-hump with your legs straight and allow the tool to work its way into the tight muscle tissue. As the Acu-hump applies pressure, you may experience some discomfort or intensity, particularly if the muscles are tightly bound. This sensation is an indication that the tool is effectively targeting and releasing tension in these areas.
Regular use of the Acu-hump can help improve the flexibility and functioning of the QL muscles, alleviating lower back pain and promoting overall comfort and well-being. It is important to listen to your body and adjust the intensity and duration of use to your comfort level. As with any new tool or treatment, it is recommended to start with shorter durations and gradually increase the time as your body adapts.
2# Step: Lumber Spinal – 1min
The versatile Acu-hump is an effective tool for relieving various types of lower back pain, including conditions like sciatica pain (bulging disc, herniated disc), and Cauda Equina Syndrome. By following these simple steps, you can effectively use the Acu-hump to alleviate your pain and promote muscle relaxation.
Acu-hump: 30-day return policy.
You have no risk.
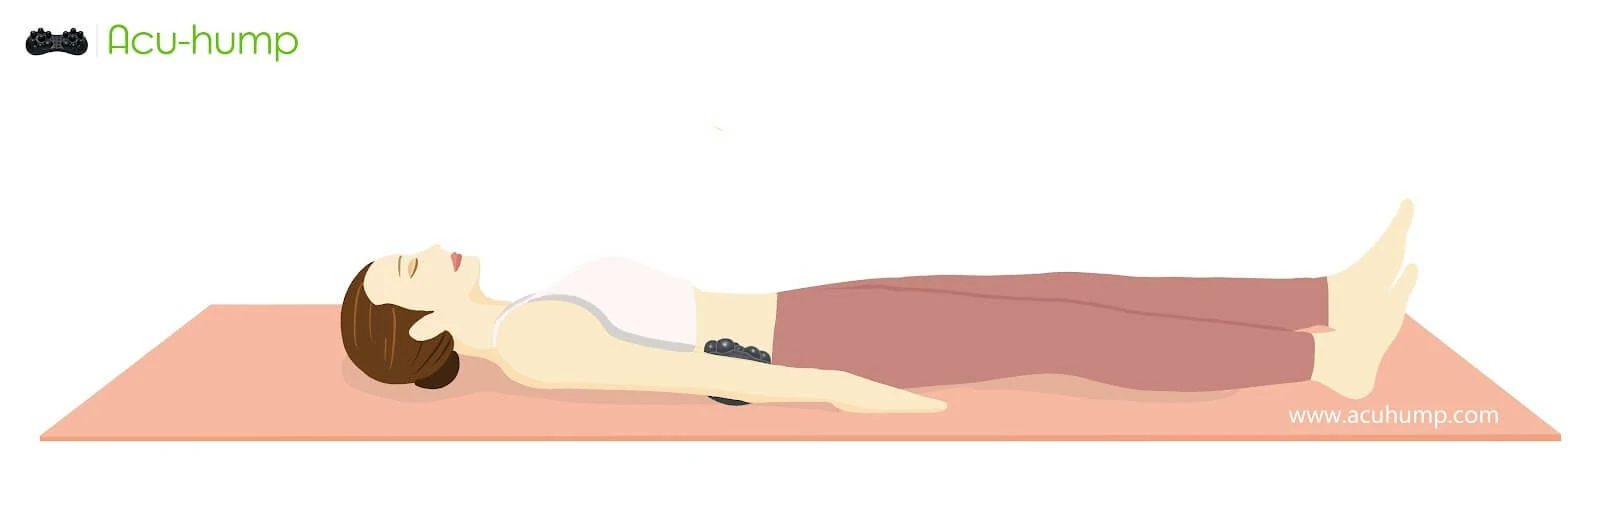
Step 1: Find a sturdy and firm surface, such as the floor, to lie flat on. This helps to apply enough pressure to release the muscles effectively.
Step 2: Place the Acu-hump massage stretcher under your spine, ensuring that the higher side is positioned near your head and aligned with the affected area. This proper alignment is crucial for targeting the specific area causing pain or discomfort.
Step 3: Hug your legs to your chest and hold this position for about 30 seconds. This gentle stretching motion helps to alleviate tension in the muscles of your lower back and reduce pain.
Step 4: Release your hands and straighten your legs while maintaining the position on the Acu-hump. Hold this new position for an additional 30 seconds. By doing so, you continue to stretch the muscles in your lower back, helping to improve circulation and bring relief.
Step 5: Repeat steps 3 and 4 as desired to achieve optimal pain relief and relaxation. Regular and consistent use of the Acu-hump can significantly improve your lower back condition and enhance your overall well-being.
Acu-hump: 30-day return policy. No risk for you.
3# Step: SI Joint – 2min
By following these steps and incorporating the Acu-hump into your routine, you can effectively relieve pain associated with Sacroiliac Joint Dysfunction and Pubic Symphysis issues.
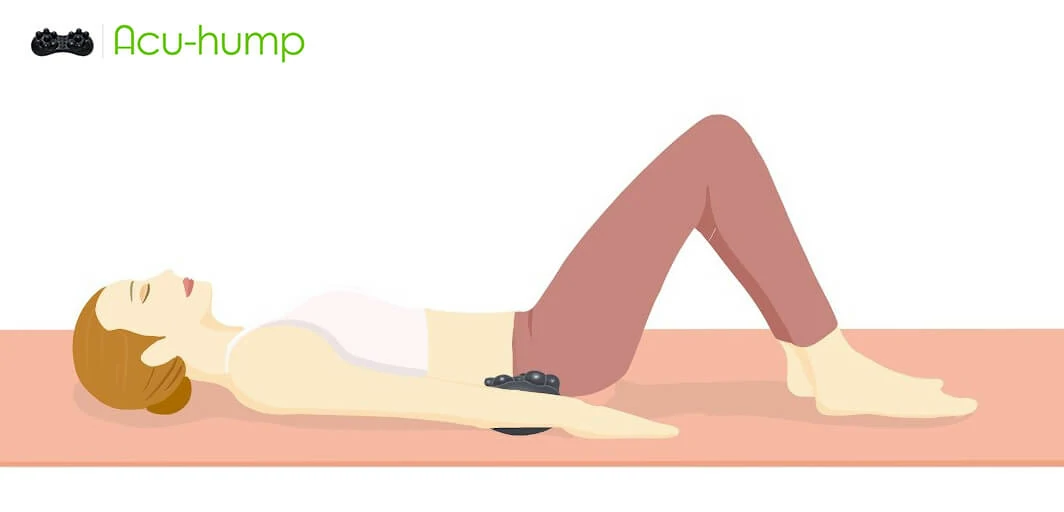
Step 1: Position the Acu-hump massage stretcher under your Sacroiliac (SI) joints, ensuring that the higher side is near your head and aligned with the affected area. This proper alignment is crucial for targeting the specific area causing the pain or discomfort.
Step 2: Bend your legs and maintain a slightly wider-than-shoulder-width distance between your knees.
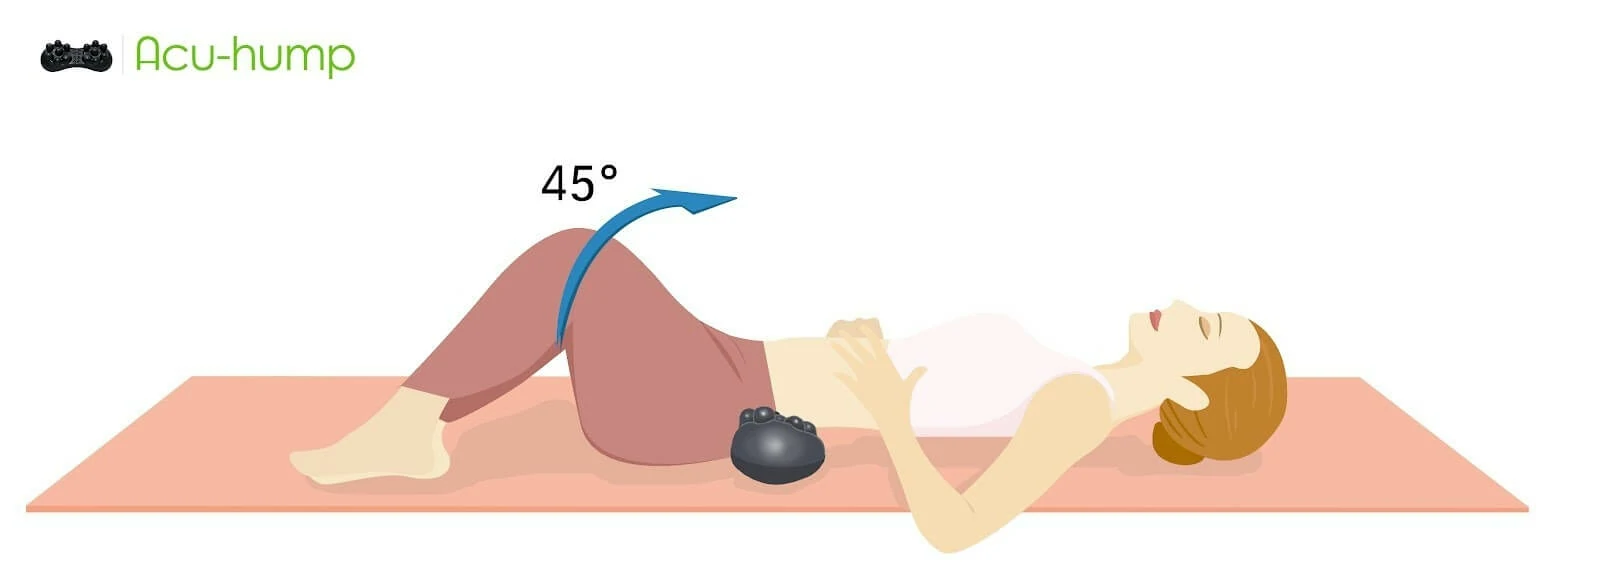
Step 4: Slowly swing both legs to the right, aiming to get them as close to the ground as possible. Maintain this position for 15 seconds before pausing for 5 seconds with the legs in the middle position.
Step 5: Perform the opposite motion. Gradually swing both legs to the left, attempting to bring them as close to the ground as possible. Hold this position for 15 seconds before pausing for 5 seconds with the legs in the middle position.
Step 6: Continue executing the movements for a duration of 2 minutes.
Acu-hump®
Release Butt & Lower Back
4# Step: Psoas & Hip Flexor – 2min
Commence by lying on your back, bending your knees, and keeping your feet a few inches away from your buttocks. Lift your hips while positioning the Acu-hump under your sacrum.
Plant your right foot firmly on the ground and draw your left knee towards your chest. Maintain this position as you gently push your left knee away from your body, to return your foot to the mat. Repeat this process for three deep breaths.
Then, switch sides and repeat.
Acu-hump® Relieve Piriformis Pain
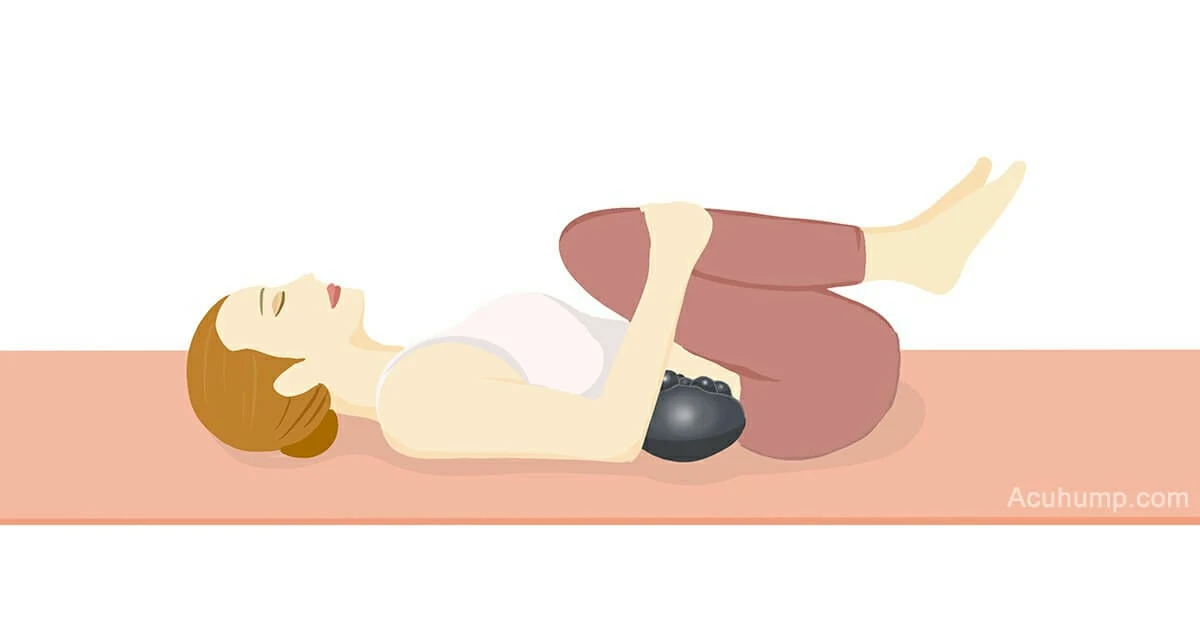
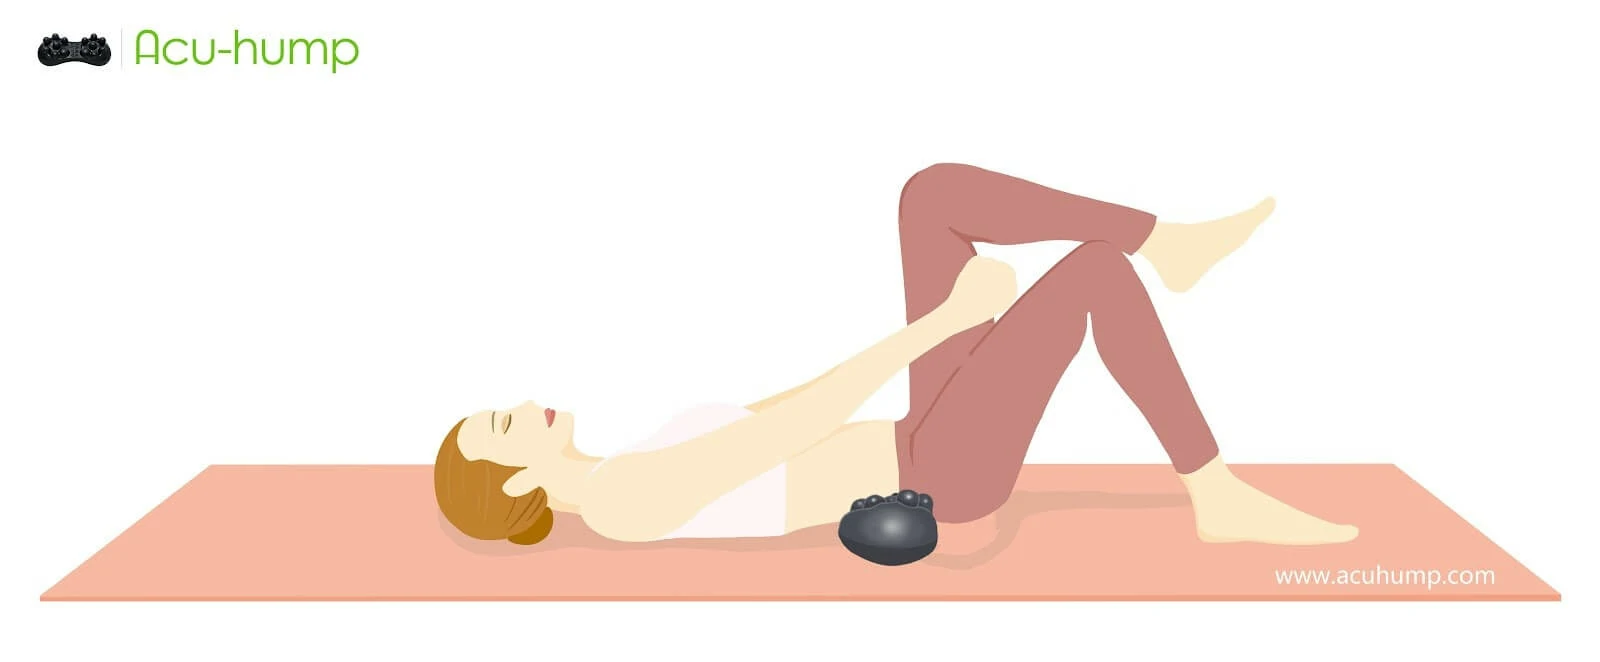
5# Step: Figure 4 Piriformis Stretch – 2min
The Acu-hump is a valuable tool for enhancing the figure 4 stretch, which specifically targets the piriformis muscles. To properly perform this stretch with the Acu-hump, follow these steps:
Begin by lying on your back with your knees bent and both feet on the ground.
Place the Acu-hump under your buttocks, ensuring that the high side of the massage stretcher is facing your feet. This aligns the Acu-hump with the targeted area and optimizes the effectiveness of the stretch.
With your left foot still firmly on the floor, cross your right ankle over your left knee, forming a figure 4 shape. This position allows for a deeper stretch and helps alleviate pain and tightness in the hips.
Using your hands, gently pull your left thigh towards your chest while maintaining a bent right knee. This action further stretches the muscles in your hip and lower back, providing relief and improving flexibility.
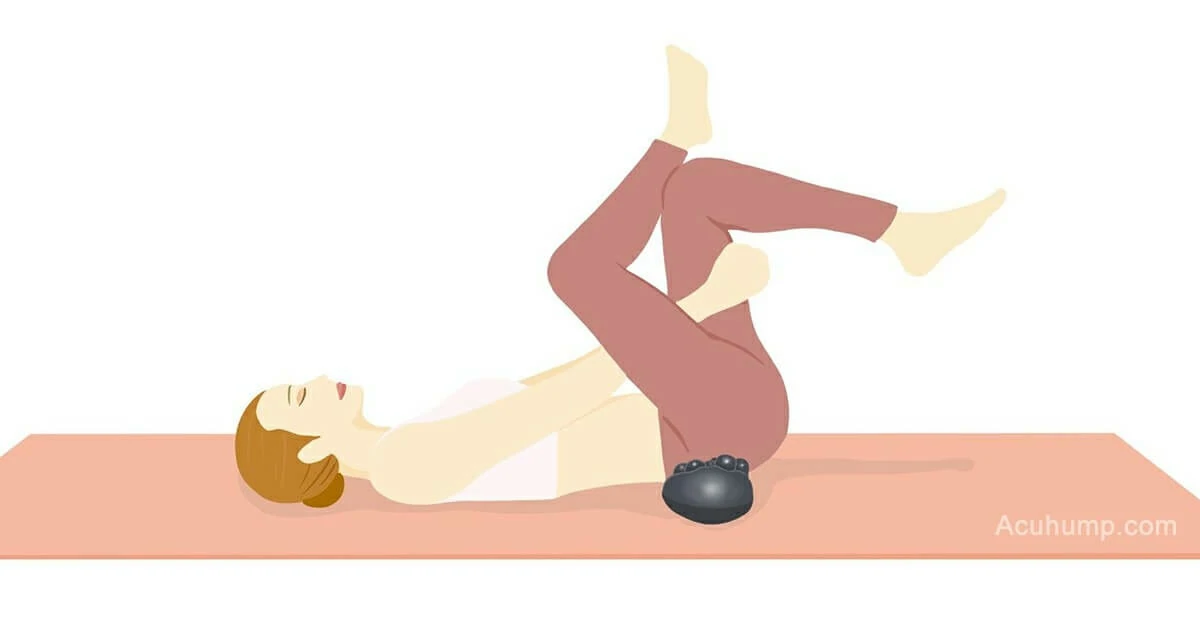
Hold this position for approximately 30 seconds, allowing the muscles to lengthen and relax. Breathe deeply and focus on releasing any tension you may be holding.
After the designated time, release the stretch and switch sides. With the assistance of the Acu-hump, maintaining the figure 4 position becomes easier, enabling a more profound and effective stretch.
Incorporating the Acu-hump into your figure 4 stretch routine offers improved alignment and helps mitigate the risk of injury, promoting healthier hips and enhanced mobility.
By following these steps and using the Acu-hump correctly, you can maximize the benefits of the figure 4 stretch and experience greater comfort and flexibility in your hips and lower back.
Acu-hump: 30-day return policy. No risk for you.
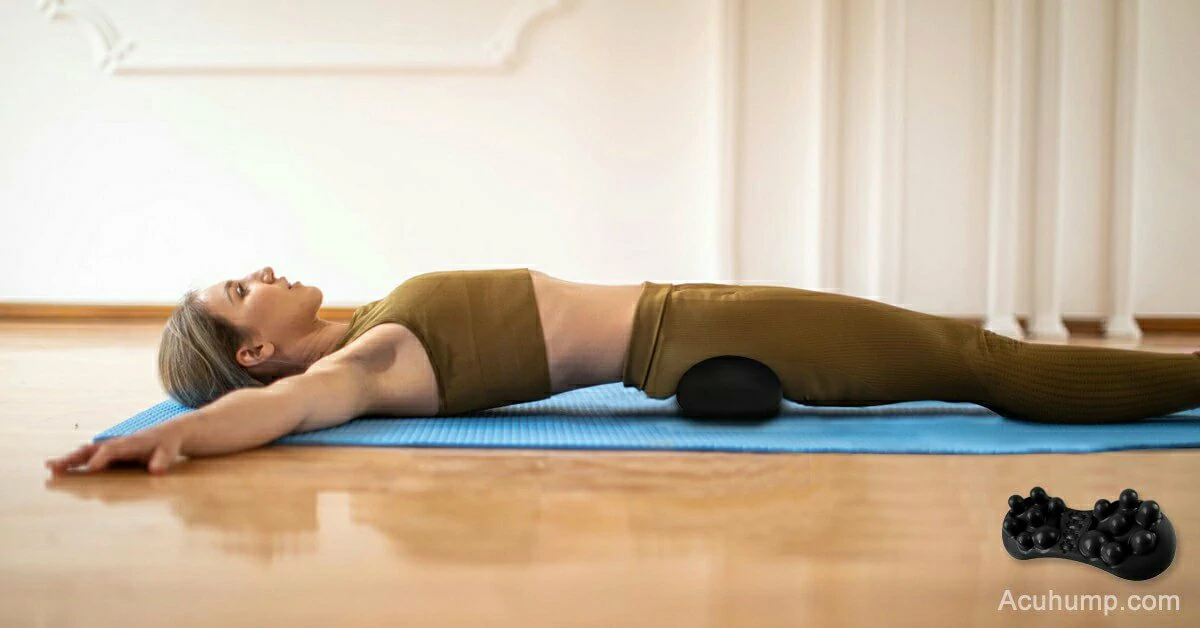
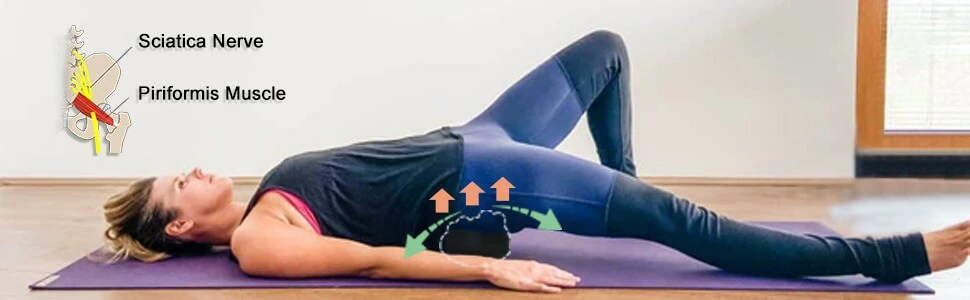
6# Step: Hamstrings – 1.5min
The piriformis muscle is located in the buttocks and plays a crucial role in the movement of the legs. To relieve this pressure and improve mobility, it is recommended to incorporate regular leg root stretching exercises into your daily routine.
Leg root stretching exercises target the muscles from the buttocks to the legs, helping to relax them and alleviate tension on the sciatic nerve. By doing these stretches consistently, you can prevent or alleviate symptoms of conditions like piriformis syndrome or sciatica.

Lying Down Variation: Find a wall and lie down. Position the Acu-hump beneath your hips and straighten your legs against the wall.
By making leg root stretching exercises a part of your daily routine, you can improve your overall flexibility and reduce discomfort in your lower back and legs. Regular practice can also help to prevent the onset or recurrence of sciatic nerve pain.
Acu-hump: Full refund policy. No risk for you.
Importance of Proper Treatment for Piriformis Syndrome
Piriformis syndrome can significantly impact daily activities and quality of life. Without proper healing, individuals may experience difficulty in sitting, walking, or participating in physical activities. It is essential to seek effective solutions to mitigate the impact of this syndrome.
What is Acu-hump
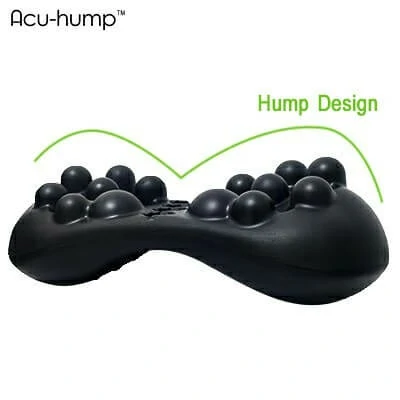
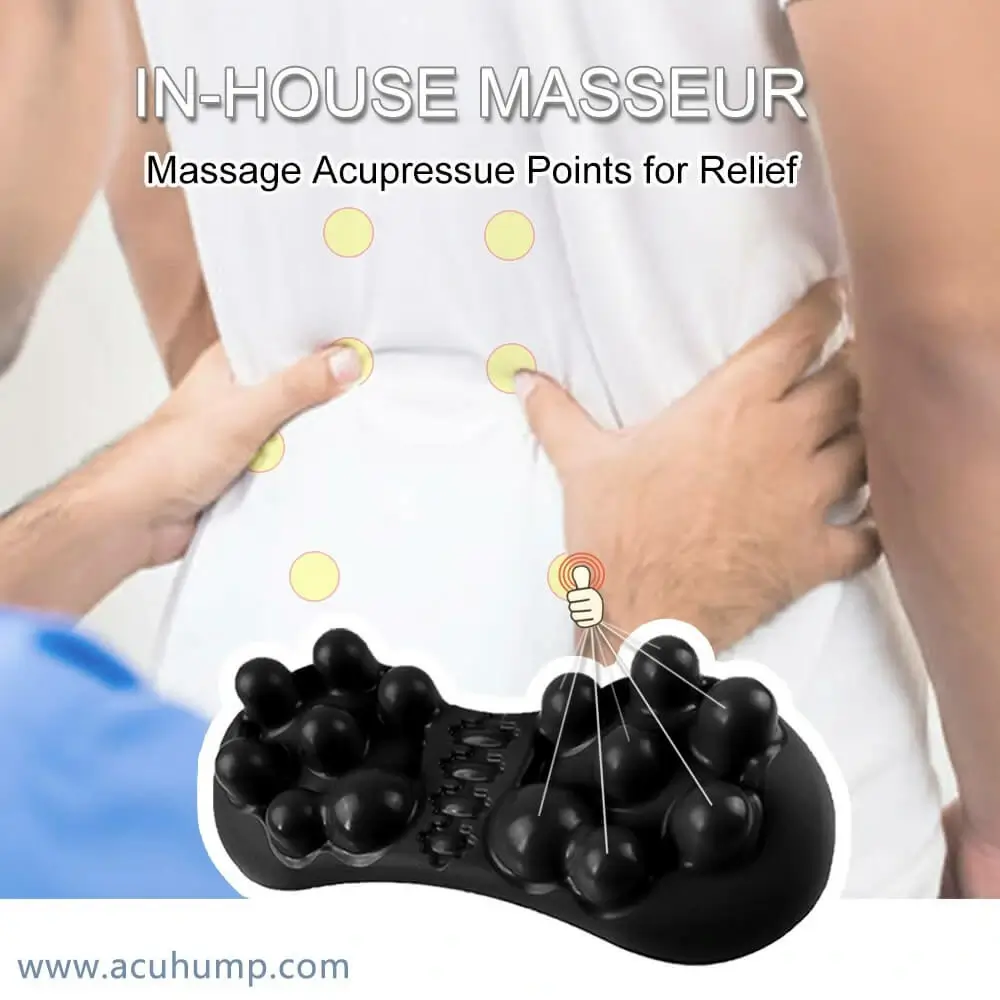
Acu-hump is an innovative solution designed to provide pain relief and muscle relaxation for individuals with piriformis syndrome. Its unique features include ergonomic design, acupressure points, and adjustable intensity levels, making it an effective tool for targeting the piriformis muscle and alleviating pain.
Acu-hump: Full refund policy. No risk for you.
Benefits of Acu-hump for Piriformis Syndrome
Acu-hump specifically targets the piriformis muscle, applying pressure to release tension and reduce inflammation. Using Acu-hump can help improve flexibility, increase blood circulation, and provide overall comfort to individuals with piriformis syndrome.
Acu-hump: 30-day return policy.
You have no risk.
How to Use Acu-hump
Using Acu-hump is simple and can be done in the comfort of one’s home. Place Acu-hump on a flat surface, lie down on it with the affected buttock directly over the hump, and gently apply pressure. Gradually increase the intensity as tolerated, holding the position for a few minutes. It is important to listen to your body and adjust the pressure accordingly.
Acu-hump: 30-day return policy. No risk for you.
Additional Tips for Managing
In addition to using Acu-hump, it is important to incorporate other management strategies for piriformis syndrome. This includes maintaining proper posture, avoiding prolonged sitting, stretching regularly, and seeking professional guidance if needed. Regular exercise, such as low-impact activities and strength training, can also help improve muscle imbalances and prevent future piriformis flare-ups.
When to Seek Professional Help
While Acu-hump can be an effective tool for pain relief, it is important to consult a healthcare professional for a proper diagnosis and treatment plan. Physical therapy, medication, or other interventions may be recommended to address the underlying causes of piriformis syndrome and provide comprehensive care.
Finding effective solutions for piriformis syndrome is crucial for individuals seeking pain relief and improved quality of life. Incorporating stretching exercises and innovative tools like Acu-hump can help all signs and promote healing.
It is important to establish a comprehensive management plan that includes regular exercise, proper posture, and seeking professional help when needed. By taking proactive steps, individuals with piriformis syndrome can find relief and regain their mobility and comfort.
Acu-hump: 30-day return policy. No risk for you.
Click to download
Stretching for Piriformis Syndrome PDF
